How to Make Balloons at Home
What you will need:
  • Balloon Latex - This is a thin latex that is pre-vulcanized. It will air cure when dry. It can be purchased in natural color and tinted, or you can get it pre-tinted.
  • Cure Agent or hardener - This will cause the latex to solidify and stick to the mold better, it can be made as follows:
    • 10 liters water
    • 5 kg calcium nitrate ( lime )
    • 1 kg talc powder ( the thinner the better )
  • A dipping container to hold the liquid latex - You can make your own from PVC sheeting, if you make it thinner than it is wide, you can make larger balloons without needing a very large amount of liquid latex.
  • A mold - The mold is a piece of  PVC, wood, or steel that is cut to the shape of the balloon you wish to make. The edges must be rounded or if left sharp, the latex will be quite thin and can have small holes in it.  PVC is the best material to use as it cuts with ease and can be hand sanded to a smooth edge.

 
How to make the balloons:
  • Pour latex slowly with a funnel and through a material like cheesecloth into the tank. 
  • After you have mixed it slowly, be sure there are no lumps, and no bubbles. These will cause weak spots in the finished balloon. Let the latex  sit overnight to settle out any impurities, etc.
  • The next day gently remove coagulated surface of latex and scrap edges. This removes any bits of hardened latex that would leave imperfections on your finished product.
  • Mix the cure agent to be sure nothing is settled on the bottom, you want a smooth consistancy for best results.
  • Wash mold and remove any dust or talc left from the last use, you want the mold to be free of any impurities that could interfere with the latex covering the mold smoothly.
  • Dip mold in the hardener, shake it and let it half dry, usually 1 minute facing up, then one minute facing down. The mold must shine a little.
  • Dip very slowly mold in latex tank ( 10 cm in 15 seconds speed. ) Dipping slowly causes the latex to cling well without disturbing the cure agent. It also prevents air from being trapped. If bubbles form they will cause weak spots called "Church Windows" which can weaken the latex.
  • After about 10 seconds have elapsed, be sure to pull the mold out to just above the main shape. This allows the neck to be thinner and gives you the means to roll the lip of the balloon.
  • It should take about 45 seconds for an average balloon... more for longer balloons. If the temperature is fairly hot it may not take quite as long. It is better to go too slow than to go too fast.
  • Sloooooly remove the balloon from the tank. Take your time, you don't want a rough surface or imperfections.
  • With fingers, roll the thin latex of the neck on itself and let the balloon vulcanize neck down in a warm place for 24 hours. This causes the chemical reaction that cures the latex into a balloon.
  • Put talc powder on the loon before removing it from the mold. This will prevent it from sticking to it's self and ruining the balloon you just made.
  • If you are going to store the balloon for later, you will want to put talc inside as well. Fresh latex likes to stick together.

 
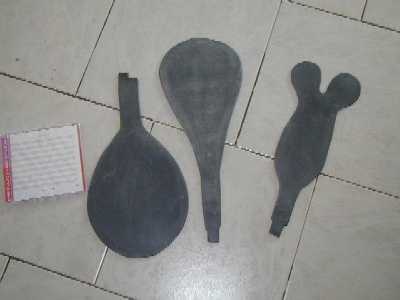
Here are some sample molds made from the PVC sheeting. These were made from the 6 mm thick stock to allow enough material that it was easy to get a fairly rounded edge.

Images and designs from Michel Martin.

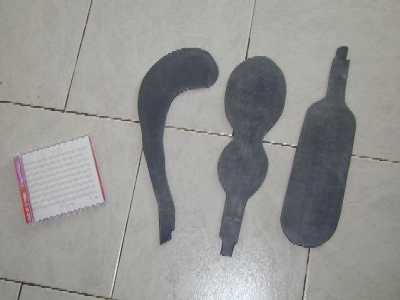
Here are more examples of the molds, you can get very creative in the design and make some very unique balloons with a little imagination!

Images and designs from Michel Martin.

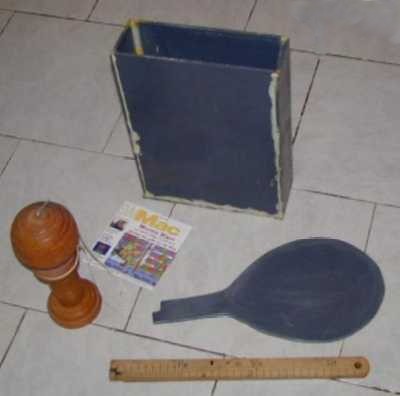
The is the simple tank for dipping the balloons. Notice that it does not need to be very thick. This tank holds about 5 liters of balloon latex. The sides were held together using neoprene glue.

Images and designs from Michel Martin.

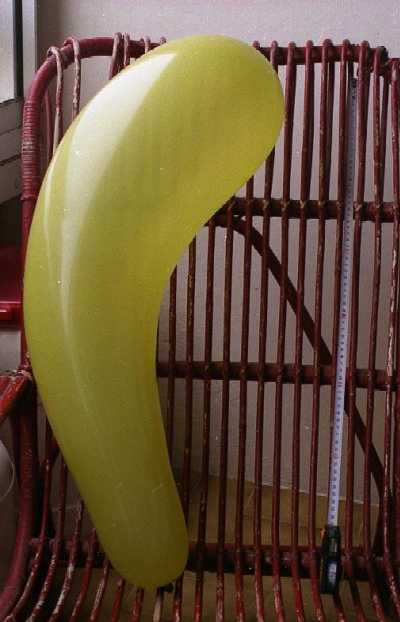
This balloon was made using the mold shown in image two. You can see that it maintained the graceful curves and has become quite large.

Images and designs from Michel Martin. 


Translated by Jerry Rutherford.    

Visit me at: ASKJERRY.INFO or visit my YouTube page.   

2016 Update

People have been asking me where to get supplies... these are two very useful links that should help you.

Monster Makers: Dipping latex :  http://www.monstermakers.com/product/dipping-latex.html

Monster Makers: Latex Pigments:  http://www.monstermakers.com/product/latex-colorants.html